Friday, April 11, 2014

Running Hadoop MapReduce Application from Eclipse Kepler

source: http://letsdobigdata.wordpress.com/2013/12/07/running-hadoop-mapreduce-application-from-eclipse-kepler/


Running Hadoop MapReduce Application from Eclipse Kepler


Its very important to learn hadoop by pracitce.
One of the learning curve is how to write first map reduce app and debug in favorite IDE Eclipse? Do we need any Eclipse plugins? No, we do not. We can do haooop development without map reduce plugins
This tutorial will show you how to setup eclipse and run you map reduce project and MapReduce job right from IDE. Before you read further, you should have setup Hadoop single node cluster and your machine.
You can download the eclipse project from GitHub

Use Case:

We will explore the weather data to find maximum temperature from Tom White’s book Hadoop: Definitive Guide (3rd edition) Chapter 2 and run it using ToolRunner
I am using linux mint 15 on VirtualBox VM instance.
In addition,you should have
  1. Hadoop (MRV1 am using 1.2.1) Single Node Cluster Installed and Running, If you have not done so, would strongly recommend you do it from here 
  2. Download Eclipse IDE, as of writing this, latest version of Eclipse is Kepler

1.Create New Java Project

new_project

2.Add Dependencies JARs

Right click on project properties and select Java build path
add all jars from $HADOOP_HOME/lib and $HADOOP_HOME (where hadoop core and tools jar lives)
hadoop_lib

hadoop_lib2


3. Create Mapper

package com.letsdobigdata;
import java.io.IOException;
import org.apache.hadoop.io.IntWritable;
import org.apache.hadoop.io.LongWritable;
import org.apache.hadoop.io.Text;
import org.apache.hadoop.mapreduce.Mapper;
public class MaxTemperatureMapper extends
 Mapper<LongWritable, Text, Text, IntWritable> {
private static final int MISSING = 9999;
@Override
 public void map(LongWritable key, Text value, Context context)
 throws IOException, InterruptedException {
String line = value.toString();
 String year = line.substring(15, 19);
 int airTemperature;
 if (line.charAt(87) == '+') { // parseInt doesn't like leading plus
 // signs
 airTemperature = Integer.parseInt(line.substring(88, 92));
 } else {
 airTemperature = Integer.parseInt(line.substring(87, 92));
 }
 String quality = line.substring(92, 93);
 if (airTemperature != MISSING && quality.matches("[01459]")) {
 context.write(new Text(year), new IntWritable(airTemperature));
 }
 }
}

4. Create Reducer

package com.letsdobigdata;
import java.io.IOException;
import org.apache.hadoop.io.IntWritable;
import org.apache.hadoop.io.Text;
import org.apache.hadoop.mapreduce.Reducer;
public class MaxTemperatureReducer
extends Reducer<Text, IntWritable, Text, IntWritable> {
@Override
public void reduce(Text key, Iterable<IntWritable> values,
 Context context)
 throws IOException, InterruptedException {

 int maxValue = Integer.MIN_VALUE;
 for (IntWritable value : values) {
 maxValue = Math.max(maxValue, value.get());
 }
 context.write(key, new IntWritable(maxValue));
}
}

5. Create Driver for MapReduce Job

Map Reduce job is executed by useful hadoop utility class ToolRunner
package com.letsdobigdata;

import org.apache.hadoop.conf.Configured;
import org.apache.hadoop.fs.Path;
import org.apache.hadoop.io.IntWritable;
import org.apache.hadoop.io.Text;
import org.apache.hadoop.mapreduce.Job;
import org.apache.hadoop.mapreduce.lib.input.FileInputFormat;
import org.apache.hadoop.mapreduce.lib.output.FileOutputFormat;
import org.apache.hadoop.util.Tool;
import org.apache.hadoop.util.ToolRunner;
/*This class is responsible for running map reduce job*/
public class MaxTemperatureDriver extends Configured implements Tool{
public int run(String[] args) throws Exception
 {

 if(args.length !=2) {
 System.err.println("Usage: MaxTemperatureDriver <input path> <outputpath>");
 System.exit(-1);
 }

 Job job = new Job();
 job.setJarByClass(MaxTemperatureDriver.class);
 job.setJobName("Max Temperature");

 FileInputFormat.addInputPath(job, new Path(args[0]));
 FileOutputFormat.setOutputPath(job,new Path(args[1]));

 job.setMapperClass(MaxTemperatureMapper.class);
 job.setReducerClass(MaxTemperatureReducer.class);

 job.setOutputKeyClass(Text.class);
 job.setOutputValueClass(IntWritable.class);

 System.exit(job.waitForCompletion(true) ? 0:1); 
 boolean success = job.waitForCompletion(true);
 return success ? 0 : 1;
 }
public static void main(String[] args) throws Exception {
 MaxTemperatureDriver driver = new MaxTemperatureDriver();
 int exitCode = ToolRunner.run(driver, args);
 System.exit(exitCode);
 }
}

6. Supply Input and Output

We need to supply input file that will be used during Map phase and the final output will be generated in output directory by Reduct task. Edit Run Configuration and supply command line arguments. sample.txt reside in the project root.  Your project explorer should contain following
project_explorer
input_ourput]

7.Map Reduce Job Execution

mapred_output

8. Final Output

If you managed to come this far, Once the job is complete, it will create output directory with _SUCCESS and part_nnnnn , double click to view it in eclipse editor and you will see we have supplied 5 rows of weather data (downloaded from NCDC  weather) and we wanted to find out the maximum temperature in a given year from input file and the output will contain 2 rows with max temperature in (Centigrade) for each supplied year
1949 111 (11.1 C)
1950 22 (2.2 C)
output
Make sure you delete the output directory next time running your application else you will get an error from Hadoop saying directory already exists.

Thursday, April 10, 2014

구글 아라 프로토 타입

source: http://www.zdnet.co.kr/news/news_view.asp?artice_id=20140409073939

구글 조립식 스마트폰 '아라'의 원형

이달말까지 완성해 다음달 공개할 예정

이재구 국제과학전문기자/ jklee@zdnet.co.kr 2014.04.09 / AM 08:45 아라 , 모토로라

소프트웨어(SW)에 이어 하드웨어(HW)에서도 개방을 지향하는 구글의 조립식 스마트폰 프로젝트 아라(Project Ara)폰 원형이 모습을 드러냈다. 구글은 이달 말까지 이를 완성해 다음 달 공개할 예정이다. 

매사추세츠공대(MIT)의 테크놀로지리뷰는 8일(현지시간) 모토로라의 조립식 스마트폰인 아라 제작현장을 방문한 결과 이달말까지 작업을 마치게 될 아라폰 원형을 공개했다. 

이 조립식 스마트폰 아라 개발팀은 오리지널 버전의 모습이 완성되고 있음을 보여주고 있다. 

폴 에레멘코 아라프로젝트 책임자는 구글이 조립식 스마트폰의 이른바 엔도스켈레톤(endoskeleton,내골격)을 제공하게 될 것이라고 말했다. 그는 “처음에는 이 내골격에 8개의 모듈을 꽂게 될 것”이라고 말했다. 

그는 “예를 들어 이 가운데 2개의 전면 슬롯에는 디스플레이 및 버튼 패널, MIPI유니프로기술에 기반한 온보드파워 및 데이터모듈이 들어갈 것”이라고 말했다. MIPI유니프로기술은 IC들을 연결시켜주는 고속 인터페이스다. 모듈들은 전기 영구자석과 함께 플랫폼에 고정된다. 

힌지 등 눈으로 보기에 거추장 스런 것들이 없다. 내골격은 패블릿, 음악플레이어용 등 다양한 사이즈로 제공된다.  

이를 제외하고도 아라의 하드웨어 생태계는 제조업체들에게 완전히 개방될 예정이다.
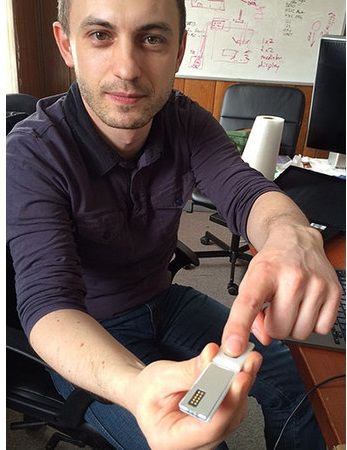
▲ 구글의 아라 프로젝트 책임자 폴 엘레멘코가 펄스옥시미터를 들어 보이고 있다. <사진=MIT>

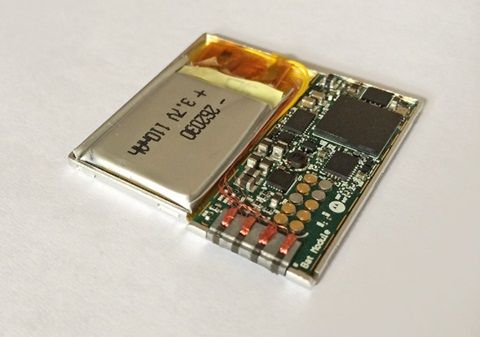
▲ 아라 폰이 조립된 사진.<사진=MIT>

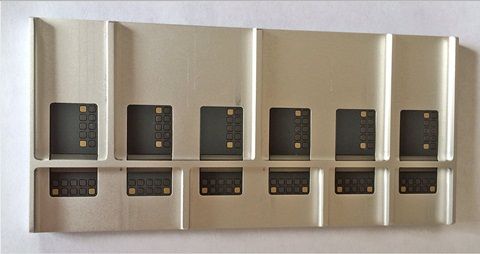
▲ 아라폰의 골격인 엔도스켈레톤은 이런 모습이다.<사진=MIT>

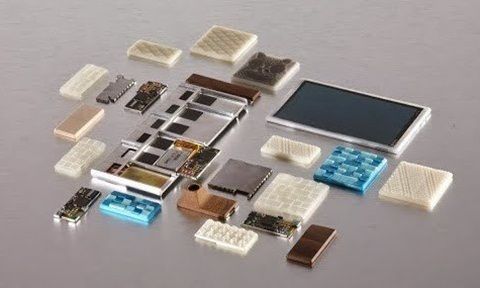
▲ 아라폰 모듈의 얼개.<사진=MIT>

▲ 아라폰의 케이스는 3D프린터로 제작돼 다양한 컬러와 모습으로 신속히 제공된다.

▲ 아라폰의 원형은 다음달 공개될 전망이다.

사용자들은 자신들이 주안을 두는 사진, 의료 모니터링, 센서 등 사용 목적에 맞게 강조된 서로 다른 부품들을 끼워맞춰 완전한 자신만의 조립식 스마트폰을 만들 수 있게 된다. 이 아라프로젝트의 첫 제품(원형)이 이달말 작업을 마치고 다음달 나오게 될 전망이다.

MIT테크놀로지리뷰는 아라폰 원형에 들어갈 혈액 산소농도 측정용 맥박산소측정기(pulse oximeter), 3D프린팅된 플라스틱에 싸인 열이미지렌즈 모듈 등을 확인했다. 자외선카메라 렌즈도 개발중인 것으로 알려졌다.

이 모든 것이 준비되면 사용자들은 자신이 원하는 기능에 맞는 부품을 엔도스켈레톤에 끼워넣어 필요에 따라 특정기능을 강조한 스마트폰을 사용할 수 있게 된다. 

구글은 단말기 외부 플라스틱 케이스 공급자로 매사추세츠에 있는 3D시스템스와 제휴해 값싸고, 빠르고 다양한 색과 모양의 케이스를 공급받게 된다. 케이스 외에 다른 부품들도 마찬가지로 3D프린터로 제작될 예정이다. 아라는 이미 디자인과 유저인터페이스(UI)에서 엄청난 혁신을 보여주고 있다.

보도에 따르면 구글은 와이파이통신이 일반화돼 있는 중남미로 가서 와이파이모듈, 칩셋, 스크린, 배터리 등으로 구성된 기본형 아라폰을 테스트할 계획이다.

이 조립식스마트폰은 제조비가 50달러에 불과하며 판매가격 책정에 고심하고 잇다. 아라폰이 나오면 25달러에 나오는 파이어폭스폰과 경쟁하게 될 전망이다.

아라프로젝트는 3천328개 업체들이 아라의 샘플을 가져갔을 정도로 관심을 보이고 있다.

첫 번 째 아라개발자컨퍼런스(Ara Developers Conference)가 오는 15~16일 이틀간 구글본사가 있는 마운틴뷰에서 열린다. 의료센서 공급업체에서 디스플레이 제조업체에 이르는 다양한 업체들이 참가할 예정이다. 구글은 이들에게 각자의 기술을 조율해 아라프로젝트가 성공되도록 할 계획이다.

다음 동영상은 아라 개발자들의 모습이다.


Wednesday, April 9, 2014

Pivotal HD Single-Node VM

source: http://pivotalhd.cfapps.io/getting-started/pivotalhd-vm.html

Pivotal HD Single-Node VM

System requirements

  • 8 GB RAM (The VM consumes 4 GB)
  • At least 30 GB free disk space
  • At least a dual-core CPU
  • NAT networking configured in the VM
  • 7z Archive utility

Pivotal HD VM contents

Pivotal HD VM is shipped with the following Pivotal products:
  • Pivotal HD 2.0 - Hadoop 2.0.5, Zookeeper, HBase, Hive, Pig, Mahout, Madlib
  • Pivotal HAWQ 1.1.4
  • Pivotal Extension Framework (PXF) 1.1.3
  • Pivotal GemFire XD 0.5 Beta
  • Pivotal Command Center 2.2
  • Product usage documentation
Other installed packages:
  • JDK 7
  • Spring Tool Suite (Eclipse-based IDE)
  • Maven
  • Git
  • Retail Demo data for tutorials
  • Sample Code

Credentials

The Pivotal HD Single-Node VM uses the following credentials:
CredentialUsernamePassword
Hadoopgpadminpassword
VM Root userrootpassword
DataLoader Web UIgpadminpassword
Command Center LogingpadminGpadmin1
sudogpadmin
user has partial sudo privileges
password
Notes: sudo is configured so that the gpadmin (default user for this VM) account can run commands via sudo without providing a password to access any of the other system accounts (mapred, hdfs, hadoop, etc.).

Scripts

You can use the following scripts to manage your Pivotal HD Single-Node VM:
  • start_all.sh – Starts all Hadoop services.
  • stop_all.sh – Stops all Hadoop services
  • start_gfxd.sh – Starts GemFire XD (Note that this script also stops some Hadoop services that are not needed for the GemFire Tutorials)
  • stop_gfxd.sh – Stops GemFire XD.

Installing the Pivotal HD Single-Node VM

  1. Note: This tutorial is directed towards users of the Pivotal HD Single Node VM version 2.0 and who received an early-access version of the VM. The instructions in this document will not work correctly with other versions. Version 2.0 of the VM will be available for download when PHD 2.0 is released.
  2. Enter the following command to extract the files using 7z:
    7za x ~/VMWare/PIVHDSNE_VMWARE_VM-2.0.0-40-2.7zs
    If you do not have a tool that can expand a 7z archive, you can download the 7z utility from: http://www.7-zip.org/
  3. Start the VM by double-clicking the .vmx file within the newly-created PIVHDSNE_VMWARE_VM-2.0.0-40 directory.
  4. After the VM starts, log in to the gpadmin user account using the password password (Note: this is also the root password.)
  5. In the VM, launch the Firefox Web browser to see the Command Center Web UI at http://localhost:5443/.
  6. Login to the Command Center with gpadmin as the username and Gpadmin1 as the password.
  7. Start Pivotal HD and HAWQ using the ~/Desktop/start_all.sh script
    Note: You can stop Pivotal HD and HAWQ using the ~/Desktop/stop_all.sh script

How to use this VM:

  1. Start the Hadoop services using the start_all.sh script located on the desktop.
  2. Follow the tutorials in the Setting up the Pivotal HD Tutorial section of this site.

Setting Up the Pivotal HD Tutorial

The Getting Started with Pivotal HD Tutorial tutorial provides a set of examples that demonstrate loading, querying, and running MapReduce Applications on a Pivotal HD 2.0 distribution. The tutorial is organized into several groups of examples, each demonstrating specific tasks.

Prerequisites

To run this tutorial, you use the Pivotal Single-Node Virtual Machine. This VM contains the Pivotal HD software, sample data, scripts, documentation, Java, Ant, Maven, and the Spring Tool Suite (STS) IDE. See Pivotal HD Single-Node VM.

Loading Sample Data

All of the examples use a common data set. The raw data is already included on the file system of the Single-Node VM. You load this data to run the examples in this tutorial.

Source code for the tutorials

The source code for the tutorials is available at https://github.com/gopivotal/pivotal-samples.git. This code is also included on the filesystem of the Pivotal HD Single-Node VM.

Running the Tutorial

The following examples demonstrate Pivotal HD features:

Map Reduce Examples

HAWQ Examples

Hive

Pig